Wednesday, July 9, 2014

Second Anniversary/Flag Pie

This fourth of July marks the second anniversary of my blog.  Woohoo!
I never thought I would still be doing it after two years!

For my first blog, fourth of July 2012, I did three separate pies: a red pie (rhubarb), a white pie (ricotta), and a blue pie (blueberry).
For fourth of July 2013 I did a cake that when cut resembled the flag.

This year I combined the two previous themes into a red white and blue Flag Pie!


The first step was to make the crust.  I was out of Crisco sticks and I have a little baby so I opted to make the crust in the food processor.

Quickie Crust:
3 sticks of unsalted butter
4 1/2 cups of flour
pinch and a half of salt
3/4 cups cold water

Just process the butter salt and flour until crumby.  Then while running slowly add water until a ball forms. Refrigerate 2 hours.


I used a blueberries for the blue filling (duh) and strawberry/rhubarb for the red filling.

Blue filling:
1 pint of blueberries
1 cup sugar
3 tbs flour


Red filling:
3 pounds chopped rhubarb
1 pint chopped strawberries
1 cup sugar
1/4 cup flour


Now to assemble the pie.
Roll out enough crust to cover the bottom of a jelly roll pan.  Press into parchment lined pan and trim excess.


Add the blueberries in the upper left hand region where the stars would be.  Add the red filling under the entire area of stripes.


Roll out the remaining crust and cut out the stars and white stripes. 
I only did 12 stars but I looked up the flag on the internet to make sure I had the right arrangement and quantity of white strips.


Bake at 425 for 20 minutes. Then lower temperature to 350 and bake for another 30 min.


Happy forth of July!!


Thursday, June 19, 2014

Goo Baby Cheesecakes

It seems that I was destined to make mini cheesecakes.


The first clue came when a woman I met at a recent baby shower was telling me that she simply could not find good mini cheesecakes.  (She was really upset about it!)

The second clue came a few weeks later when a large box arrived from Rob's aunt. Most of the box contained things for my baby, but she also included 6 mini cheesecake pans!

The final clue came when I was trying to think of something to make for the last day of my mommies group. What could be better for mommies with new babies then baby cheesecakes?


As a side note: I named this post "Goo Baby Cheesecakes" because that is what I call my little baby goo.  (It is a baby talk adaptation of "baby girl."  Plus with all that drool she certainly is a gooey baby!)

The recipe is as follows:  (Remember with cheesecakes the batter is the easy part.  What really matters is the baking and cooling technique.)

CRUST:
1 cup gram cracker crumbs
1 stick butter (unsalted)
Melt butter and mix with graham cracker crumbs.  
Press into six 5" spring form pans.

BATTER:
three 8 oz packages of cream cheese (room temp)
1 cup sugar
6 eggs (separated)
1 tsp vanilla
1 pint sour cream
1/3 cup flour
Preheat over to 350.  Place jelly roll pan filled 1/2 way up with water in oven with no rack above. 
Whip up the cream cheese with the sugar.  
Add egg yolks and then vanilla. 
Whip egg whites till foamy and add to mixture.  
Fold in flour and then sour cream.  
Pour batter evenly amongst the six pans.  
Wrap outside of each pan with foil (too keep the water out) and carefully drop each onto the jelly roll pan in the oven.  
Bake for 40 minutes and turn oven off.  Leave too cool in oven for 4 hours or overnight. 
Refrigerate cakes for 4 hours or overnight before removing from pan.  
Place in pretty packaging your wonderful husband ran around town buying for you.


I did it twice . . . 12 cheesecakes ready to go!!

Wednesday, February 26, 2014

Valentine's Day


I usually like to make something extra complicated and chocolate for Valentine's Day.

What I opted for this year was a recipe from my "Lost Desserts" cookbook.
This recipe was the signature desert at the Windows On the World restaurant.
I never had the chance to go there but I imagine it had the potential to be very romantic,  with the skyline views and late 60s Mad Men style.


This cake seemed to fit the criteria as it was made of layers of orange LIQUEUR soaked chocolate genoise cake alternating with crisp chocolate pastry layers.   
These layers of textural opposites are tied together by layers of rich dark chocolate ganache.

I was ready for this cake too be an epic battle,  But it was relatively easy.

The day before I made the chocolate pastry.  
This essentially amounted to a sweet pie crust.  
And the recipe even called for the use of the food processor making it even easier!

Chocolate Pastry Layers:
3 cups all purpose flour
1/2 cup cocoa powder
1/3 cup sugar
1/4 tsp baking soda
pinch of salt
3 sticks unsalted butter (cut in cubes)


Pulse together all of the dry ingredients in the food processor
Add in butter pieces and pulse till loose and crumbly.
Pour in cold water and pulse till dough forms a ball.
Refrigerate for 2 hrs or overnight.
Roll out into desired shape and size of final cake.  (The recipe called for a 9" round but I made 2 small 4"x8" rectangular cakes.)  Don't worry you can trim them a bit after they bake.
Prick all over with fork.
Bake between layers of parchment and baking sheets for 30 minutes at 325.

Of course I realized I didn't have any cocoa powder after I already started so I substituted in melted semi sweet pieces instead.  Turned out fine, although didn't distribute through the dough as well.  You can see the marbling in the picture above :-(

Next I made the Cake.

Chocolate Genoise Cake:
1/3 cup cake flour
1/3 cup cornstarch
1/4 cup cocoa powder
1/4 tsp baking soda
3 large eggs plus 3 yolks
3/4 cups sugar
pinch of salt

Sift together all dry ingredients.
Beat eggs and yolks in electric mixer.
Heat egg mixture in double boiler till warm. 
Return to mixer and beat again on high for 5 minutes until light and fluffy.


Slowly fold dry into wet.


I used a 9x13 baking pan with parchment, which suited my rectangular cakes.  The recipe again called for a 9" round baking pan.

Bake at 350 for 30 minutes.
Let cool and cut into desired shapes. 


Orange Liqueur Soaking syrup:
Simmer 2/3 cups sugar with 1/3 cup triple sec (or Grand Marnier if you are fancy and rich)until sugar is dissolved.

Chocolate Ganache:
1 1/2 cups heavy cream
6 tbs butter
1 1/4 pounds semi sweet chocolate

Heat cream and butter.
Pour over chocolate.
Cool until spreading consistency.  About 2 hours.


Assemble the cake:
Spread a fine layer of gancahe on plate.
Lay down one pastry layer and then another layer of ganache. (Before you start take note of how many layer of each you have.  It is far better to end on a pastry layer then a cake.)
Add a cake layer and pour some of the soaking liquid over it until nice and moist.


Continue until all of the layers are utilized.
Cover the entire cake with remaining ganche.
If you have trimmings from the pastry layers crumble them up and add them to the sides of the cake, or decorate as desired.


I was afraid this cake was going to be impossible to cut, due to the hard pastry layers, but with a serrated knife and a little sawing motion it was just fine.

I enjoyed this cake . . . I don't think Robby was thrilled though. 

Hope you had a romantic day!


Tuesday, December 31, 2013

Christmas 2013

I have been so busy lately that I haven't had time to blog!

I missed telling you about the Thanksgiving Pie Off and the Holiday Cookie Off!
 
Pie Off
Cookie Off
Not to mention all of the cookies I made . . . 


Florentines, jingle bell bars, thumbprints,
Bourbon balls, linzers, Dulce de leche . . .
Robby even made mocha Venetians!

Oh well, give me a break I am 9 months pregnant! (Refer to Christmas belly below.)


Instead of going backward and blogging about things that are outdated, although delicious, I am simply going to tell you what I made for Christmas this year.

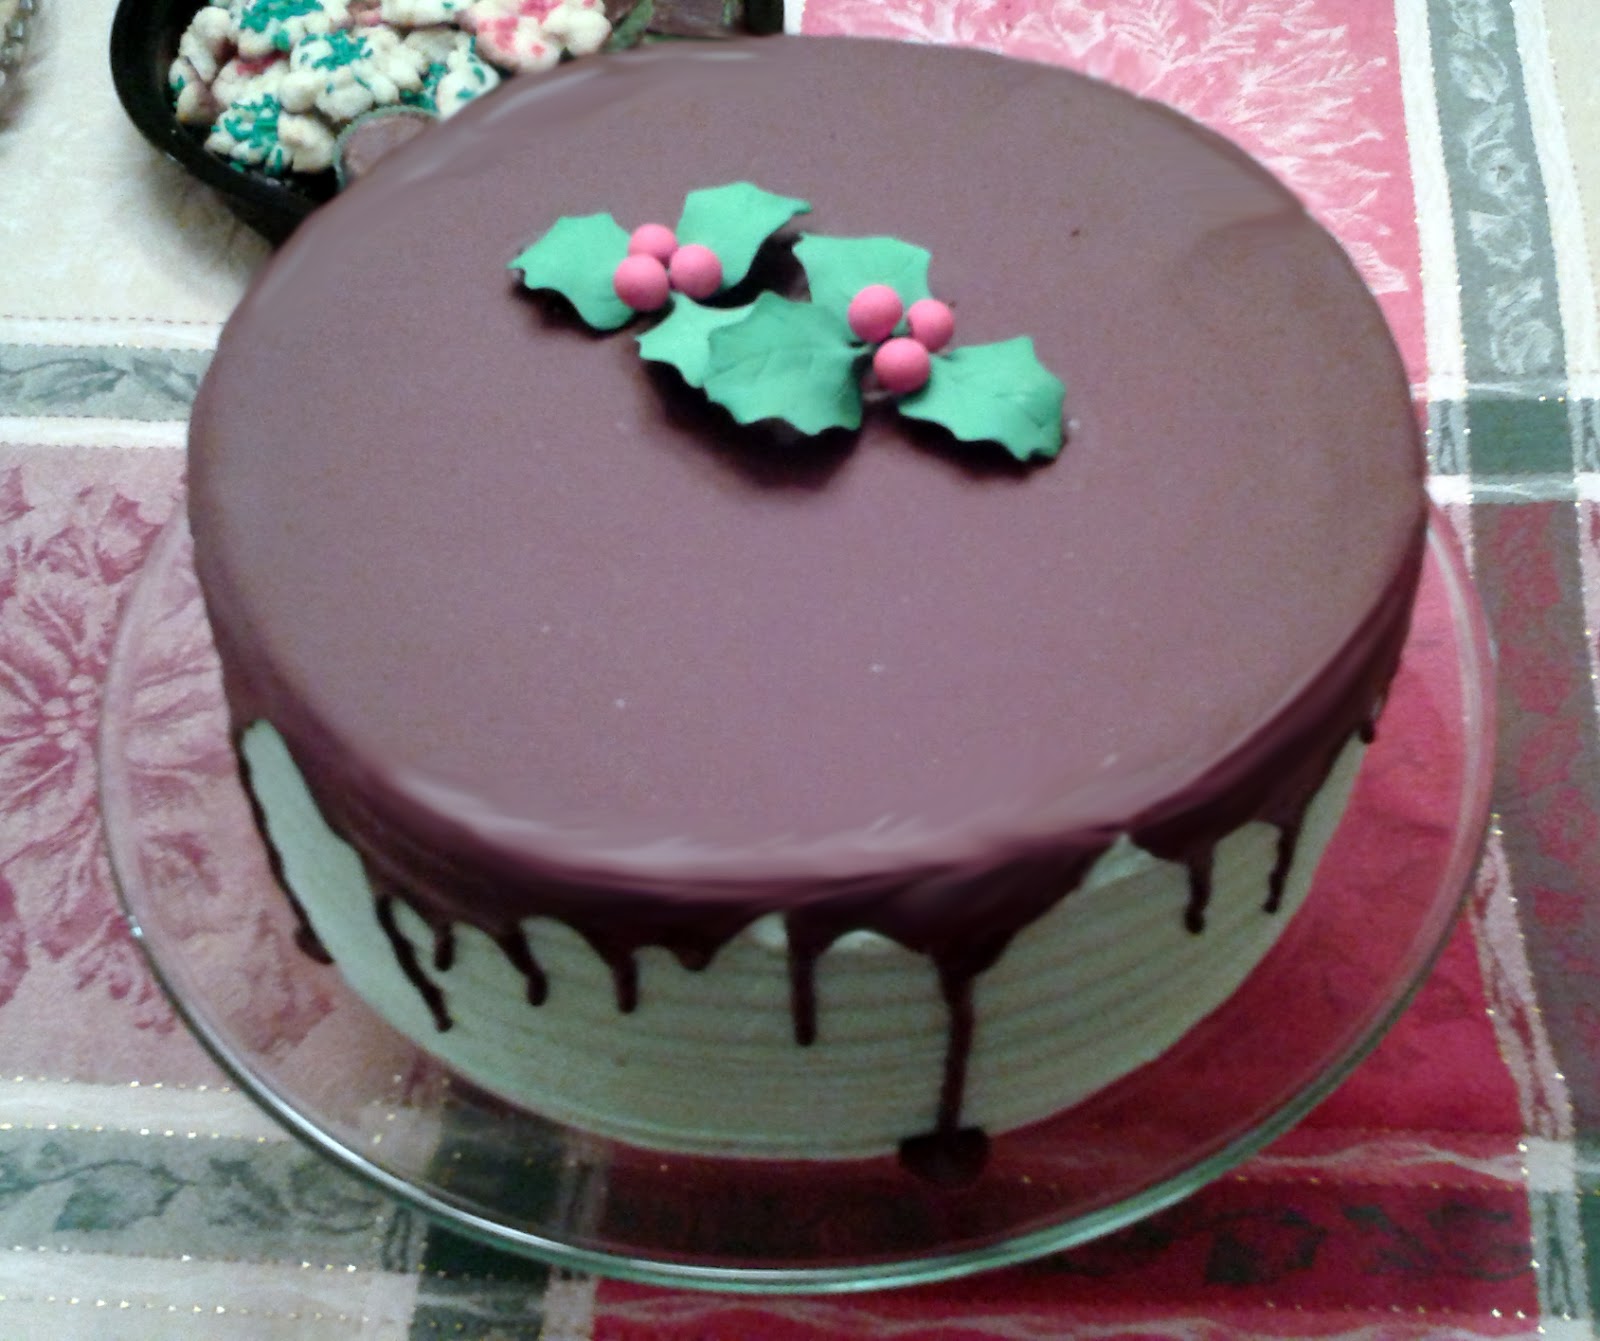
Christmas Peppermint Cake
 
Apple Cranberry Christmas Wreath


This year was a Dolan Family Christmas.  Meaning we saw the in laws on Christmas Eve and my family on Christmas day.

One of my other big cake fans, besides Robby, is my Aunt Angel. 
She asked for a peppermint cake. 
And good thing I listened cause she got me some darn good Christmas presents, as usual! 
Thanks Ange!

I also usually make something more in an Irish vein for my dad. 
(Irish only in that he is Irish.  Usually it is more "all American" involving some type of crust and APPLES!  He is addicted to apple desserts.)

____________________________________________________________________

I'll start with the cake . . . 


This cake is easy cheesy!  I made it up with some decorating inspiration from the "internets."
I used my good old Oprah endorsed Chocolate cake recipe, with a few minor alterations to make it a little less moist (it tends to fall apart) and more Christmasy (with eggnog instead of buttermilk).
I filled it with my red velvet cake icing, which I added a healthy dose of peppermint extract to.
And finally i iced it with the same filling only with some green food coloring added.

Chocolate Cake:
3 oz dark chocolate chips
1 1/2 cups hot coffee
3 cups sugar
2 1/2 cups flour
1 1/2 cups cocoa
2tsp baking soda
1 tsp baking powder
1 tsp salt
3 eggs
3/4 cup vegetable oil
1 cup eggnog
1 tsp vanilla
Preheat oven to 300.
Chop chocolate and pour hot coffee over it. Let stand stirring occasionally until chips dissolve.
Sift together dry ingredients.
Beat eggs until lemon color. Add oil, buttermilk, vanilla, and chocolate mixture.
Add dry to wet and beat until just combined.
Divide between three 10" pans lined with parchment
Bake for 1 hr.
 
Filling/Icing:
16 oz cream cheese
2 cups heavy whipping cream
16 oz mascarpone cheese
3 cups confectioners sugar
3 tsp peppermint extract
green food coloring
 
let cream cheese come to room temp.
Whip cream.
Add mascarpone to cream cheese, add sugar and extract.
Fold whipped cream into cheese.
Color 1/2 to minty green.
 
Chocolate Shell Topping:
8 oz dark chocolate
8 oz butter melted
 
Pour hot butter of chocolate.
Let stand mixing occasionally till smooth.
 
Assemble the cake:
Layer as follows: cake - filling - cake - filling - cake - icing . . .
Pour chocolate shell over top.
Enjoy!
 
 
_________________________________________________________________________
 
Now for the Apple Cranberry Christmas Wreath . . . .


This is waaaaaay easier then it looks.
It is essentially a galette, which is a fancy way of saying flat free form pie.
 
First you'll need to MAKE pie crust.
 
I did a butter crust bc i had no patience to find the shortening in the cabinet.
 
Crust:
2 sticks of butter
2 1/2 cups of flour
1 tbs sugar
1/2 cup cold filtered water
 
I also experimented by mixing this all on low in the stand mixer.  Worked pretty well.
Refrigerate until ready to use
 
Filling:
This filling is easy as pie (I think i may have used that line already . . oh well, it is true.)
6 granny smith apples peeled and sliced
1 cup cranberries (fresh)
1/2 cup sugar
1/4 cup flour
spices of choice (cinnamon, all spice, nutmeg, ginger, you get the idea) as much as you like
 
 
Roll out the crust to about 14" circle.
Arrange filling in circle leaving about 5" clear in center and 2" around outside..
Cut small hole in center and fold crust up onto filling.  Do the same with the outer perimeter.
Use scraps and Christmas cookie cutters to make top crust.  Laying each cookie crust on top of the other in a pretty overlapping montage of Christmas. 
Add some egg to the remaining filling juice and pain top crusts.
Bake at 350 for 45 minutes.


Tuesday, November 12, 2013

Everyone is Getting Married!

It always seems like  everything happens at once.
Right now it seems like everyone is getting married!!
This past weekend, for example, I had a bachelorette party on Sat and a Bridal Shower on Sunday. (For two different ladies.)
Of course I made a cake for each!
For the bachelorette I made a Crème Angeles Coconut cake in the form of a wedding dress with a "Barbie" stuck in it. (Actually a "Chloe" from the dollar store in Manhattan.)
For the bridal shower I made a 6 tiered cheesecake.

(here they are in our fridge)


I will show you how to construct both cakes.
(For the cheesecake you can refer to my cheesecake blog for the recipe and the for the Bride cake you can use any cake/filling combo you want.)


Bachelorette Cake:
I won't even tell you the type of sexy cake I made for my sister's bachelorette  years ago, as this is a family blog. Needless to say this cake is much classier and toned down. . . . more in the vein of a "wedding" theme rather than the "wedding night."
The first thing to do is to make any cake and filling of your choice.
If you have different sized cake pans that is best as you are going to stack the layers in a bowel.
I used my wedding tiered pans. A 10", 9", 5", 7", and 3". (Cut each layer in 1/2 and trim off all crusty/browned edges.)
You'll prob need to 1 1/2x the recipe for both the cake batter and the filling.
Select a bowl that is tall enough to fit the "Barbie's" legs.  (I didn't do a good job and had to remove the poor lady's legs to get her to fit.)
Line the bowl with plastic wrap.
Place a layer of filling at the bottom of the bowl.
Trim a layer of the smallest cake so that it fits over the filling at the bottom of the bowl.
Continue layering filling and cake circles until you reach the top of the bowl.


Refrigerate overnight.
Now the fun part!
Invert the cake onto a lovely plate.


Using a sharp knife shape the cake to your desired skirt shape.  (Try not to eat the pieces!  I failed!)


Cut a small cylinder of cake from the center so that inserting the doll doesn’t split the cake and stick her in.


The doll Robby got me from the dollar store actually had a wedding theme.
Don't worry, my lovely and helpful husband washed her off good before we stuck her in people's food.

 
Whip up a white icing of your choice. I made a simple butter cream. (Make sure not to use brown vanilla extract or it will off-color the icing.)
Cover the cake and the required amount of doll to make it look like a wedding dress.
I had to keep putting her in the fridge then taking her out and shaping it a little at a time. 

(arms up!)

(sooo pretty!)


Bridal Shower Cake:
I made a version of this earlier in October, but didn't have time to blog it.
 
(Sheila's Bridal Shower Cake . . . November Wedding . . . very Irish)
 
(Sam's Bridal Shower Cake . . . March Wedding . . . kinda springy)

This one is for my sister-in-law (Sam), who likes cheesecake.
Again i just used my wedding tiered pans and 1 1/2x my cheesecake batter recipe.
All you have to do is bake the cakes as normal refrigerate them overnight, stack, and decorate.
Easy Cheesy!

10"

+ 9"

+7"

+5" + 3"

+ sugar flowers = pretty nice cake
 

Tonight I am going to start making an orange grove cake for Rob-be-bo, but I probably won't blog again for 2 more weeks when I have the 3rd annual Thanksgiving Pie-Off (@ work)!!!


CONGRATS SHEILA AND SAM!! (Looking forward to the big day(s)!)